Inkscape tips: Difference between revisions
m →Making clean map borders: spaces before pics. |
|||
| Line 67: | Line 67: | ||
Do the following. You can get quite quick at it after a while: | Do the following. You can get quite quick at it after a while: | ||
Select the path | Select the path | ||
Press CTRL+ALT+C | Press CTRL+ALT+C | ||
Select the path and the map outline you drew earlier | Select the path and the map outline you drew earlier | ||
Press CTRL+- | Press CTRL+- | ||
Press CTRL+SHIFT+K | Press CTRL+SHIFT+K | ||
http://i44.tinypic.com/2wlt26g.png | http://i44.tinypic.com/2wlt26g.png | ||
Revision as of 17:06, 10 February 2015
This page gives tips on how to perform common tasks in Inkscape related to WarLight map development. Also check out SVG workarounds if you're having problems having your SVG file show up correctly.
Unioning
It's possible to have one player-controllable territory that spans several objects in Inkscape. This can create islands off the coast of a territory, which is used in several WarLight maps.
To accomplish this, first make all of the objects as individual territories. Then select them all at once, and select Path -> Union.
Fixing small territories
The union feature can also be used to ensure players can click on small territories. Take, for example, Baja from the Earth map. In its raw form, it's way too small to fit an army number or be clickable:

To rectify this, we draw a circle on top of it:

Then select both the new circle and the Baja territory behind it at the same time. Select Path -> Union, and observe the resulting territory:

Cutting holes
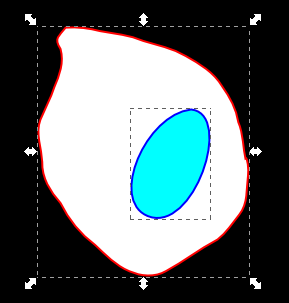
Sometimes maps call for having territories inside of other territories. It may be logical to just make both territories and put the outer one behind the inner one, but this doesn't work since in WarLight player-controllable territories should never overlap. Instead, a hole should be cut in the bigger territory so the smaller one can persist in the hole.
To accomplish this, we use the Path -> Difference command. To begin, select both territories (the inner and outer one) at the same time using Shift+Click

Then select Path -> Difference. This will delete the smaller object and leave the outer one with a hole.

Since this deletes the inner object, you should consider making a duplicate of it, and perform the operation with the duplicate.
Simplify
Sometimes territories can contain way more data than they need. One example is after drawing territories with the pencil tool, if you view the vertices (F2) you'll see it has an excessive amount.
This is easy to fix simply by selecting Path -> Simplify (Ctrl+L). This reduces the number of vertices drastically, and in most cases, doesn't alter the appearance of the object at all:

Not only does this make the object easier to work with and increase the performance of Inkscape, it also reduces the size of your resulting WarLight map which makes it load faster and allows you to fit more objects into your map.
Path Division
One way of building WarLight maps is to divide larger areas into smaller territories with the path division operation. It can be used to divide a single region into two according to another path that defines the border between the new regions.
To split a region, you naturally first have to have drawn this region as a proper Inkscape path. Begin by drawing the desired border as a new path using, for example, the Pen tool. It does not matter if the path defining the border extends outside the territory you wish to split, as it disappears when this operation is complete.
After drawing the new border, select the region with the Selection tool, and then also simultanously select the dividing path while pressing the Shift key. Then select the Division operation from the Path menu, or press its shortcut Ctrl+/. You now have two regions that you can modify separately, and perhaps split again to make smaller regions. It is a good idea to simplify the dividing path before doing this, as simplifying the two new regions afterwards separately usually changes their border shapes in different ways.
When splitting a large continent into bonus regions, you can make use of the Inset operation after making all the divisions. Using an inset of half a pixel (set by going to Inkscape Preferences and opening the Steps tab) on each of the bonus regions should make their borders appear adjacent in the recommended way. After defining all the bonus regions, no further insets are needed, as inside each bonus region the recommended way is to have the borders overlap. Because of this, the bonus regions and their insets should be done first when mapping a larger continent.
Making clean map borders
This section will teach you how to make clean map boarders.
Draw the entire map outline. Ignore bonuses for now.
Draw a line where you want your first bonus border to be. Set the line width to 0.8 pixel.

Do the following. You can get quite quick at it after a while:
Select the path
Press CTRL+ALT+C
Select the path and the map outline you drew earlier
Press CTRL+-
Press CTRL+SHIFT+K

There you go! A clean bonus border! Now do it until all bonuses are separate paths.
Draw a line where you want your first territory border to be. The width of the line doesn't matter now.

Select both the path and the bonus, and press CTRL+/.

There you go! A clean territory border! Now do it until all territories are separate paths.